It is common knowledge that water and wood are not exactly good friends. Exposure to water can severely damage wood.
In this article, we will give you everything you need to know about water damage wood repair, but first, let’s take a quick look at how to identify water-damaged wood.
Here are some key signs to look for:
- Discoloration: Water-damaged wood often exhibits noticeable discoloration. Look for dark spots, stains, or patches that differ from the wood’s original color. The discoloration may appear blotchy or spread in irregular patterns.
- Swelling or Warping: Water absorption causes wood to swell or warp. Check for changes in the wood’s shape, such as bulging, buckling, or bending. Pay attention to areas where the wood appears uneven or no longer aligns properly.
- Softness or Sponginess: When water saturates wood, it becomes soft and spongy to the touch. Gently press on the suspected damaged areas and assess if they yield or feel softer compared to unaffected wood.
- Texture Changes: Water-damaged wood may exhibit changes in its texture. It can become rough, pitted, or develop a grainy appearance. Run your hand along the surface to detect any irregularities.
- Mold or Mildew Growth: Excessive moisture provides an ideal environment for mold and mildew to thrive. Look for visible signs of mold growth, including black, green, or fuzzy patches on the wood’s surface. Musty odors can also indicate the presence of mold.
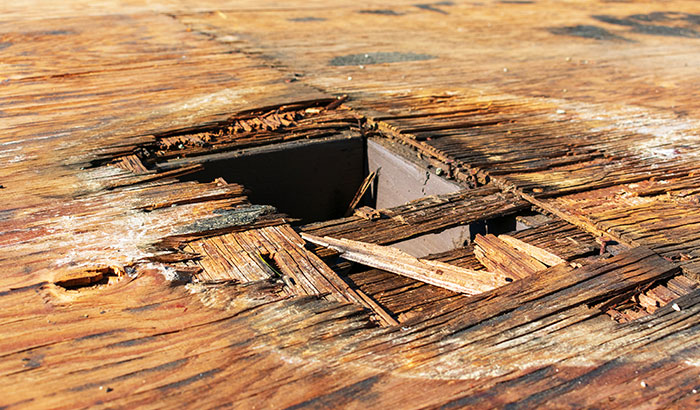
- Decay or Rot: Prolonged exposure to water can lead to wood decay or rot. Check for soft spots, crumbling sections, or areas easily crumbled or damaged by touch. Decay often causes the wood to lose its structural integrity.
- Peeling or Flaking Paint or Finish: Water damage can cause paint or finish to peel or flake off the wood surface. Look for areas where the paint or finish is lifting or separating from the wood.
- Water Stains or Rings: Water stains or rings are a common sign of water damage. They appear as discolored rings or irregularly shaped patches on the wood’s surface. These stains can be lighter or darker than the wood’s original color.
- Musty Odor: Water-damaged wood may emit a musty or moldy smell. This odor is often indicative of underlying moisture issues or mold growth. Sniff the affected area or wood to detect any unusual or unpleasant odors.
- Visible Water Source: If you are aware of a recent water event or a known source of water intrusion, inspect the surrounding wood for signs of damage. Pay close attention to areas directly in contact with the water source.
Something to keep in mind is that water damage can sometimes be hidden beneath the surface or within walls. If you suspect water damage but cannot identify it visually, consider consulting a professional inspector or water damage restoration specialist who can use specialized tools and techniques to detect hidden damage.
Now, let’s go through what steps are involved in repairing water-damaged wood:
- Identify the Source: To address water damage wood repair effectively, it is crucial to identify the source of water intrusion. Carefully inspect the area and check for any visible leaks, such as dripping pipes, roof damage, or malfunctioning appliances. Identifying and fixing the source is essential to prevent further damage and ensure a successful repair.
- Safety First: Prioritize your safety throughout the repair process. Before starting any work, turn off the electricity in the affected area to eliminate the risk of electrical shock. Additionally, wear appropriate protective gear, including gloves, goggles, and a mask, to safeguard yourself from potential contaminants in the water.
- Assess the Extent of Damage:
- Thoroughly assess the extent of water damage to the wood.
- Look for visible signs such as discoloration, warping, or swelling.
- Pay attention to areas where water may have seeped in and caused hidden damage. This detailed assessment will help you plan and execute the necessary repairs accurately.
- Remove Water and Moisture: Remove any standing water from the affected area. Depending on the volume of water, you may use pumps, wet vacuums, or buckets to extract the water. Afterward, focus on drying the area thoroughly. Utilize dehumidifiers, fans, and open windows to promote airflow and aid in drying. Properly drying the wood is crucial to prevent further damage and inhibit mold growth.
- Document the Damage: Before initiating any repairs, document the water damage by taking detailed photographs or videos. Capture the extent of the damage from various angles, including close-ups of any affected areas. This documentation will be valuable for insurance purposes and serve as a reference throughout the repair process.
- Restore Proper Ventilation: Ensure adequate ventilation in the affected area to facilitate drying. Open windows and doors to allow fresh air to circulate. Additionally, use fans or air movers strategically to promote airflow and expedite the drying process. Implementing proper ventilation is vital for preventing the growth of mold and mildew.
- Salvage or Replace: Based on the severity of the water damage, determine whether the affected wood can be salvaged or needs to be replaced. Minor damage, such as slight warping or discoloration, can often be remedied by sanding and refinishing. However, extensive damage may require the complete replacement of the affected wood to ensure a thorough, lasting repair.
- Mold Inspection: Conduct a thorough mold inspection in the affected area, paying close attention to hidden or hard-to-reach spaces. Look for visible signs of mold growth, such as dark spots, fuzzy texture, or a musty odor. If mold is detected, consult a professional mold remediation service to address the issue promptly. Mold can pose health risks and compromise the structural integrity of the wood if left unattended.
- Drywall Inspection: If the water damage extends to the walls or ceilings, inspect the drywall for signs of swelling, softness, or mold growth. Damaged drywall may need to be cut out and replaced to ensure a thorough restoration. Carefully assess the extent of the damage to determine the appropriate course of action.
- Structural Integrity: Assess the structural integrity of the affected wood. Look for signs of decay, rot, or compromised stability. This evaluation is particularly important for load-bearing elements such as beams or floor joists. If you suspect significant structural damage, consult a professional contractor or structural engineer to assess the situation and provide expert guidance.
- Treat for Mold: If mold is present in the affected area, it must be addressed before proceeding with repairs. Mold remediation may involve using appropriate antimicrobial solutions, thorough cleaning, and specialized techniques to remove mold growth effectively. Consult a professional mold remediation service to ensure safe and comprehensive mold treatment.
- Moisture Content Testing: Measure the moisture content of the wood using a moisture meter. This tool provides accurate readings of the wood’s moisture levels. Monitoring and documenting the moisture content over time will help determine when the wood has reached an acceptable moisture level for repairs. Adequate drying is crucial to prevent future issues such as mold growth or warping.
- Drying Techniques: Implement various drying techniques to expedite the drying process. Use air movers strategically to promote airflow and encourage evaporation. Position dehumidifiers in the affected area to remove excess moisture from the air. Consider employing heat sources, such as space heaters, to aid in drying, especially in colder or more humid environments. Regularly monitor moisture levels during drying to ensure progress and prevent potential issues.
- Prevent Future Water Damage: Take preventive measures to avoid future water damage. Promptly repair any leaks, address drainage issues around your property, and consider installing water detection systems or implementing waterproofing measures as needed. Taking preventive steps can minimize the risk of future water damage to your wood structures.
- Structural Reinforcement: In cases where extensive water damage has compromised the structural integrity of the wood, consider reinforcing the affected areas. This may involve adding additional supports, braces, or employing sistering techniques. Reinforcement ensures the long-term stability and durability of the repaired wood.
- Proper Sanding and Refinishing: Proper sanding is essential to remove any damaged or discolored wood when repairing minor water damage. Use a variety of sandpaper grits to achieve a smooth and even surface. After sanding, apply appropriate wood finishes or sealants to restore the wood’s appearance and protect it from future moisture-related issues.
- Address Odors: Lingering odors from water damage can be unpleasant and indicate underlying issues such as mold or bacterial growth. To address persistent smells, thoroughly clean and sanitize the affected areas. Utilize odor-neutralizing products specifically designed to eliminate musty odors. If the odor persists, consult professionals who specialize in odor removal to identify and mitigate the source of the smell effectively.
- Regular Inspections: After completing the water damage wood repairs, schedule regular inspections to monitor the condition of the repaired wood. Conduct visual checks for any signs of recurring water damage, such as discoloration, warping, or mold growth. Promptly address any new signs of damage to prevent further issues and ensure the long-term integrity of the repaired wood.
- Insurance Coverage: Contact your insurance company to understand the coverage for water damage repairs. Thoroughly document the damage, repairs performed, and keep records of all associated expenses for accurate reimbursement. Provide the insurance company with any necessary documentation or reports from professionals involved in the restoration process.
- Professional Assistance: In cases of extensive water damage, significant mold infestation, or complex repairs, do not hesitate to seek professional assistance. Water damage restoration companies or contractors specializing in wood repair possess the expertise, tools, and experience to ensure a thorough and successful restoration process. Professional guidance can help you navigate challenging situations and achieve optimal results.
Let Utah Disaster Clean Up & Restoration Take Care of Your Water Damage Cleanup
With over 20 years of experience, Utah Disaster Clean Up & Restoration knows how to clean up water damage. We strive to do our best to restore and reconstruct your home to its former glory. Our fast and friendly service will get you through this stressful experience quickly and seamlessly.
Contact Utah Disaster Clean Up & Restoration today, and let our trained professionals take charge of your water damage restoration.